I couldn't NOT share this incredible 70mm sculpt from over on Oz Painters.
Always look to the classics, especially when sculpting on such a large scale.

A chronicle of projects restoring and sculpting scale fantasy and science fiction miniatures
Wednesday, December 14, 2011
Sunday, November 27, 2011
Sorcerer's Apprenticeship
Those tedious aspects of painting minis: Filing off the flash, pinning the feet for a special base. Priming. The drag work. The boring parts.
If you could have a studio apprentice do one thing for you in your miniature modeling and painting practice, what would it be? This is completely fantastical, use your imagination.
For me, it would definitely be a person dedicated solely to mixing the small balls of Green Stuff I use to sculpt. I would have a far more efficient sculpting experience every time if that activity were done by someone else. Wish they had a machine to do it.
But you know what they say (or as Ian McShane as Lovejoy once said): you want something doing you do it yourself.
Tuesday, November 8, 2011
Horrors... a Glimpse into Progress
This combo-picture is a bit old but still shows where the Horrors of the Marsh set has gotten to. I've since read about proper photo set-up and will be able to provide better-lighted and more-detailed images soon.

I recently located some of the oddball minis that were based on the same sculpts from the Horrors of the Marsh set but in different poses with different weapons. As soon as I have them in-hand I'll post a picture.

I recently located some of the oddball minis that were based on the same sculpts from the Horrors of the Marsh set but in different poses with different weapons. As soon as I have them in-hand I'll post a picture.
Monday, October 17, 2011
State of Decay: A Favorite Doctor Who Story
"I never drink...WINE"

I enjoy gothic stuff a lot, so a recent request to my brother to pull the classic Dr. Who episode 'State of Decay' from his vast library and pay a visit proved to be particularly satisfying during this pre-Halloween time of the year (in spite of me falling asleep on the last episode).
(Oh, by the way, this post has got sod-all to do with minis)
I like this one so much because of the tasteful blend of science fiction and gothic themes, and its ability to conduct the combination so well into the final product. The design is particularly neat and the Vampire Lords who feature as the first-tier villains would made excellent minis (Uh oh, in addition to the Gibbering Mouther I'm trying to make progress on now I ponder the idea of doing my first humanoid sculpts of the Vampires...).
The above screen-grab came from the Doctor Who Reviews page on this episode.
Sunday, October 9, 2011
Creature Comforts, the Overall Environment
My fanaticism with miniatures goes back a long way, to childhood, and because of that the hobby factors into a larger suite of similarly themed creature-comforts (no pun intended) that make me feel right at home, giving a sense of security. But many are all inspired to the same theme, a fantasy, swords-and-sorcerer type environment that was really heavy in the 70s and 80s.
Just imagine an Autumn night in an American suburb, homework done, Judas Priest on the record player, a little time spent painting some minis, watch a movie like Dragonslayer or Conan on the VHS, eat some cookies, fall asleep dreaming about medieval weapons, types of dragons, how a crossbow works... etc.
If you share this same type of sentimentality you need to buy and read the book Fantasy Freaks & Gaming Geeks by Ethan Gilsdorf(and if you're reading this you've probably already read the book).
His story is his own, and gets a little heavy at times because of his situation growing up, but everyone who has ever rolled some dice and drawn a dungeon on graph paper is going to find something poignant in this book. I read it a few years ago actually, and never really thought about posting this until I got a nice comment on my recent post - - - . I should probably read it again. It's fun and interesting, I'm glad he wrote it.
Thursday, September 29, 2011
The Little Things in Life
Moved recently, into a new house. Well, it's an old house, but new to me because I just moved there. Accordingly I get a new workspace to set-up in. This is always pretty exciting, to go through stuff, get rid of stuff, organize it, test it out, see where the tools can go, discard the dried up old paints, see how the desk fits best, get the CD player plugged in etc.
It's comforting. It's comforting to know there's a place where I can sit down and pay massive amounts of brain activity to tiny little objects, things often less than 1" tall. It's so strange really, it's a big world out there with a lot of big things, but a corner of my mind is fascinated by the tiny little things. That's at the root of any collector/painter's passion I suppose.

A static miniature, painted up and sitting there on a table is a big idea, an imaginative environment, compressed into a tiny little icon. I like the idea of beholding this tiny little icon, picking it up (with clean hands, mind!) and eyeing it carefully, respecting it as a catalyst for thought, a little three-dimensional illustration of a snippet of a larger universe.
Go into any museum that has ancient Egyptian artifacts: the magnetism of all of those tiny little jewels and sculptures buzzes so palpably. Same thing with a visit to an antique shop that has a display case filled with lead toy soldiers. I love it. I can't define it, but I love it.
If you're reading this I'm sure you do too.
Looking forward to sharing more items soon - thanks for reading!
Wednesday, September 21, 2011
The Ambull Complete. My First Sculpt: Cast and (roughly) Painted
Here is the Ambull sculpt cast in resin, having been assembled, primed and roughly painted. I was eager to give it a wash to pick out all the details to see how I did sculpting-wise, so it's not given the royal-treatment as far as painting goes. Not bad on the exposure of the details and texture, I'm quite proud of it, and happy to have earned some good Green Stuff experience.


Saturday, September 17, 2011
Belched
This blog came to my attention and it's pretty awesome, this is exactly part of what I want to do at some point: take old minis and paint them up real sweet like little masterpieces. Excellent work goes into the minis on Belched From the Depths. Cool stuff.
Monday, September 12, 2011
A Cast of... one, so far
First resin cast was pretty lousy, air bubbles needed some venting, so I cut little v-shaped grooves into the rubber. Second casting came out pretty nice. I've sprayed it with gray primer for the photo (milky-white resin doesn't show much surface detail).

Recently moved living circumstances and am enthusiastic about creating a new work area.

Recently moved living circumstances and am enthusiastic about creating a new work area.
Thursday, September 8, 2011
..after a hiatus... Ambull progress
Life went topsy turvy for a while, as it sometimes does, but I'm back with another post showing more progress on the Ambull sculpting project.
I intentionally fused the two halves of the mold together by leaving a small area at the top uncovered by release agent. This helps keep the two sections in register.
The completed mold:

I was pretty satisfied with the detail, only a few small bubbles that would not be so bad to deal with in the final casting:

Hopefully I can get back into the swing of things here and make some more regular posts. I met mold-maker and pewter-caster this weekend who used to work in the miniatures industry. It was a nice opportunity to learn a bit more about the spin casting process. Gave me food for thought about future projects and realizing them in metal (instead of just resin).
Friday, July 22, 2011
Sculpting an Ambull: Molding and Casting Continued
Here is a size comparison showing the Ambull Green next to an old Rogue Trader era Space Marine mini. I'm pretty satisfied with the scale, which is lucky because when I started the sculpt I did not pay too much attention to how big it was going to be.

This got me thinking more (for the future) about how to properly size a project before beginning. I printed out different sizes of Leonardo's Vitruvian Man to get an impression of how big or small certain scales of minis should be. Tom Meier wrote this very helpful article about this on his blog about minis and proper proportions.

This got me thinking more (for the future) about how to properly size a project before beginning. I printed out different sizes of Leonardo's Vitruvian Man to get an impression of how big or small certain scales of minis should be. Tom Meier wrote this very helpful article about this on his blog about minis and proper proportions.
Thursday, July 21, 2011
Sculpting an Ambull: Molding and Casting Continued
Once the first part of the mold had cured, the other side was removed. This consisted of the bottom of the mold box and the clay that was used as a barrier. The master and the sprues remain in place in the first part of the mold.


I use Vaseline as a separating agent between the two mold parts. RTV silicone will stick to itself really well, so a barrier cream is vital, at least on the rubber itself (most other materials are fine with silicone). I had some really old silicone that I was diluting with some silicone thinner, so these were definitely not ideal mold-making situations. Hopefully at some point in the future I can offer some examples of a more professional approach.
This picture shows the other component of the Ambull, the legs and back of the upper body. Same concepts applied: LEGO box, clay wall around the master, sprues cut from wood (found the dowels to be a bit better than the square stock). The little divots in the clay were pressed in with the back of a paintbrush. Once the rubber is poured in, they will serve as pegs to register the front and back parts of the mold.

Wednesday, July 20, 2011
Even More... Sculpting an Ambull
First half of the mold is poured. I do not yet have access to vacuum and pressure chambers, so it does make molding and casting a little difficult. I've done larger things before, but certainly nothing this detailed. In a case like this I simply drizzle a thin layer over the most crucial part of the mold and let it settle a little, doing as best a job to make sure the bubbles are gone. This is allowed to cure, whereupon subsequent layers can be added without too much concern for bubbles (as these would simply fill out the bulk of the mold).
Drizzle:

Drippy - This was allowed to cure before more rubber went on top:

Blobby:


Tuesday, July 19, 2011
Still More... Sculpting an Ambull
Top of the creature is sculpted, with respect to where the break of the two parts will be. I did have to slightly incise the Green Stuff a bit at the top to get it to separate but the join worked out well. Pink line indicates the break:

When I was sure I could not do any more damage to the sculpt, I began to clay-it-in for mold-making (it was my intention from the outset to try to cast a few in resin to make a little 'herd'). I began with a LEGO wall box, using a plasticine type clay to occupy form the barrier for the first half of the mold. Sprues and channels were made out of bits of wood.
The triangular part at the top is a pouring funnel built into the mold.

Monday, July 18, 2011
More Sculpting an Ambull
Forehead details were fun. I was really getting the hang of Green Stuff at this point, still sticking to the wooden tools I had carved initially, and more comfortable with the amount of water involved to properly lubricate and sometimes soften the material. Green Stuff sculpting must be done with a jar at hand.
Sculpting details on the Ambull's 'forehead' was fun, I redid the biomechanical tubes and meshed the mottled texture into the tubes. All the while I was thinking about how paint-able I wanted it to be, lots of recesses and lots of little raised bits to catch a nice drybrushing.

Sculpting details on the Ambull's 'forehead' was fun, I redid the biomechanical tubes and meshed the mottled texture into the tubes. All the while I was thinking about how paint-able I wanted it to be, lots of recesses and lots of little raised bits to catch a nice drybrushing.

Sunday, July 17, 2011
Sculpting an Ambull... More Progress
I had been avoiding it, but it came time to start describing the texture for the back of the creature. This area would be very prominent on the final model and I want to make it enjoyable to paint. I started slowly, but soon found a style that worked and went with it. Bear in mind that past the basic form I wasn't too interested in trying to duplicate the Citadel mini, but to make my own variation.
Back texture, what I thought of as 'scales:'


Back texture, what I thought of as 'scales:'


Saturday, July 16, 2011
Sculpting an Ambull... Continued
At a certain point it became important to consider how the two halves would fit together on the final model. They had a decent join with a little pin-and-hollow style registration but the detail would need to match up pretty seamlessly. I rubber-banded the front and back together to see how it could be done.


Around the same time I was adding some texture and bulk to the abdomen area, nothing planned, just kept adding little blobs to see where it would go. I worked the veins on the arms more.


Something I learned while working on the arms that I tried to avoid when doing the legs: I worked on one arm at a time, and because it was early days yet for my sculpting abilities, each one has a fairly different look, a different style of texture, in spite of the attempt to make it similar. Had I done a little on each arm per session, there would have been a more uniform appearance.
Friday, July 15, 2011
Sculpting an Ambull Continued
As I moved forward on the project I became more accustomed to the tendencies of Green Stuff, including the time sensitivity: when first mixed it acts a certain way, but after about 30 minutes it starts to cure and toughen. This can be troublesome at first but with more use one can use these attributes to an advantage.
Here are some additional images from the progress:

And a basic four-shot sequence of a typical application of a detail: Get a lump of Green Stuff in the area, push it in to get decent adhesion, I then blended it into its substrate and finally applied the necessary texture. Again, this is the first scale mini I've sculpted, so the detail and the form are rather crude.

More soon.
Thursday, July 14, 2011
Sculpting an Ambull Continued
I did the eyes first, because I figured if I could not get the eyes down, the whole fig wouldn't read right. Next was the fangs, or pincers. I inserted some tiny brass rods to support the fangs, and did a few layers of Green Stuff to get the shape right.

I serrated the pincers by adding tiny bits of putty at appropriately spaced intervals, but did not stress shaping them until they were cured, whereupon I was able to slice excess material off, sand them flush with the face of the pincer and shape up the spaces between with a thin file. Also shown here is some arm detail and the start of the details on the back.

I learned the hard way not to try to add too much in one sculpting session: I would get a nice area completed on one side and start on another, only to find a few minutes later that a forgetful finger had marred the first area. Nice thing about Green Stuff is: if you like what you've done - put it down and let the stuff cure. I see now why the pros have multiple figs going at once. Work on a little at a time.
Claws went through a few stages: bent brass rods served as supports, drilled and inserted into the ends of the arms, a few layers of Green Stuff shaped it up and made a decent pair of graspers.

Looking back at this project I should have made the ribbed inner-arms more uniform, wrapped wire or something, to give it a more alien Giger-like look, but it wasn't so bad freehand, and does lend it that early Citadel junky-punky style. More details soon - thanks for tuning in.
Wednesday, July 13, 2011
Sculpting an Ambull in Green Stuff
I wanted an Ambull. I thought they were cute and goofy looking, and would probably provide a decent painting experience.
But I could not get one, the original Citadel minis were proving very hard to find - so I decided to make one.
Ambulls are nasties from the old Rogue Trader 40k book. Citadel did a two pack blister (I believe) with two poses, each fig came in two parts.
This is an abbreviated series of progress pictures project from last year. I posted a lot more over on dakkadakka.com before I started Ghola Scale, this is simply an abridged report on that project. Previous attempts at sculpting scale minis did not go so well, but I got some Green Stuff and discovered how versatile and easy to work with it was. I have no real sculpting experience at all, so it was a real jump into the unknown. Overall the project was very inspiring and only time and space has stayed my hand from further sculpts.
It started with wire
Aluminum wire (I had yet to discover copper wire's superior pliability) was used to rough out the skeleton, which was then covered in Green Stuff.

This was the first time I had used a two part epoxy putty, and I discovered quickly that water lubricates tools against the stickiness.

I at first used very crude wooden tools carved from popsicle sticks, which seemed well enough but in retrospect I probably could have afforded a little more detail had I used some pointed metal tools.
Basic form came together quickly, but as I discovered the devil was in the details (pics coming next post)

But I could not get one, the original Citadel minis were proving very hard to find - so I decided to make one.
Ambulls are nasties from the old Rogue Trader 40k book. Citadel did a two pack blister (I believe) with two poses, each fig came in two parts.
This is an abbreviated series of progress pictures project from last year. I posted a lot more over on dakkadakka.com before I started Ghola Scale, this is simply an abridged report on that project. Previous attempts at sculpting scale minis did not go so well, but I got some Green Stuff and discovered how versatile and easy to work with it was. I have no real sculpting experience at all, so it was a real jump into the unknown. Overall the project was very inspiring and only time and space has stayed my hand from further sculpts.
It started with wire
Aluminum wire (I had yet to discover copper wire's superior pliability) was used to rough out the skeleton, which was then covered in Green Stuff.

This was the first time I had used a two part epoxy putty, and I discovered quickly that water lubricates tools against the stickiness.

I at first used very crude wooden tools carved from popsicle sticks, which seemed well enough but in retrospect I probably could have afforded a little more detail had I used some pointed metal tools.

Basic form came together quickly, but as I discovered the devil was in the details (pics coming next post)

Friday, July 8, 2011
The Hobby Workshop
In my county there was a hobby shop in a strange old-style mall. The mall was The Bazaar, the store was called The Hobby Workshop. It closed when I was really young, but memories of the place are etched deep. They had an impressive variety, from plastic kits, radio control, to a huge wall of Matchbox cars and a lot of fantasy-minis. This was the early 1980s. I remember they had a display case with all kinds of minis in there, some may have been painted but I remember the unpainted silver ones more keenly. Particularly the walking brain (which I later learned was an intellect devourer). I went along with my father and brother when they went, there was so much to look at, to stumble upon in the way of imagination and creativity. If I could only travel back in time to browse again...
The other day I drove by the last hobby store in my county, a decrepit invalid hold-out called 3B Hobbies. It was in an awkward tiny brick building in the middle of a neighborhood that had outgrown it decades ago. It stood like a homeless woman passed out in a pile of garbage on a corner of a main drag. It had been closed every time I've checked in the past few years, but the other day it was empty - BUILDING FOR SALE. The last hobby store, which could barely be called such, finally dead. I wonder what they had in their basement. Shrink wrapped boxed sets of Heritage and Grenadier minis? Cardboard boxes full of blisters untouched for twenty years? Who knows, all gone. Dead and buried.
The other day I drove by the last hobby store in my county, a decrepit invalid hold-out called 3B Hobbies. It was in an awkward tiny brick building in the middle of a neighborhood that had outgrown it decades ago. It stood like a homeless woman passed out in a pile of garbage on a corner of a main drag. It had been closed every time I've checked in the past few years, but the other day it was empty - BUILDING FOR SALE. The last hobby store, which could barely be called such, finally dead. I wonder what they had in their basement. Shrink wrapped boxed sets of Heritage and Grenadier minis? Cardboard boxes full of blisters untouched for twenty years? Who knows, all gone. Dead and buried.
Sunday, June 26, 2011
Lead Rot: Plague of Metal Minis
Lead rot. A nasty business, actually it's heart-breaking. And older minis are very susceptible to this affliction which as good as destroys them.
Mike Monaco wrote up a nice piece here about lead rot. For those of you who know what it's like, you can sympathize, but for those who have not seen it, below are some excellent examples of in-progress rot, eating away at some classic Grenadier minis.
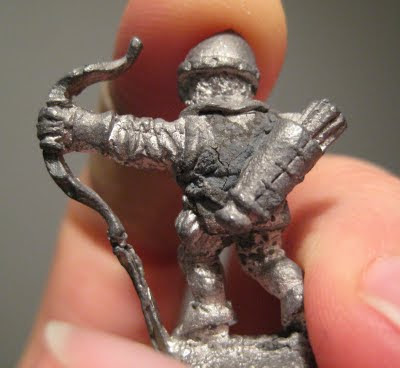
Here are two sets, both Grenadier's Fighting Men (red box series came out after the original AD&D sets, so the bottom one is the older one).

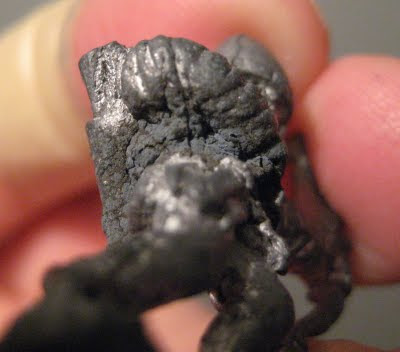
Online auctioneers who are selling metal soldiers may think of them as just that, a box of metal soldiers. They are most likely not aware of the condition they are in and so do not include that in their descriptions. No hard feelings, it is what it is. (in this case the seller didn't know much at all, several of the figs are not even part of this set, they're strange orphans from other Grenadier sets or blisters - I'll have to spend some time trying to ID them) I was annoyed though, to say the least. I bought the red-box version some months ago, and three out of the ten figs were afflicted. So I spent a little time looking for a duplicate set to replace the nasty figs. I got the original AD&D set and it came in the other day. My heart sank when I opened the lid and saw the awful dark gray, it was pretty bad, in fact this was the worst I've seen so far. Here are the ghastly images:
Terrible
Looks like a disease of some kind, the rot bubbles up...

Nasty
You can actually see the cracking in this image, it's like what happens to the people in Lovecraft's The Colour Out of Space
Gross
More cracking on the archer. Curious where the rot starts on some of the figures...
Disgusting
The year and company inscription barely visible... green stuff too, not the good kind...

Hideous
Simply awful, once a nice flat shield, now a pizza-like moonscape, the likes of which might be seen on Dorian Grey's mug shot...

This one was interesting because the figure is not yet physically deformed, but the shades of gray appearing foretell how things will go. Now that these are with me they will be properly stored, hopefully progress of the rot will be arrested.

Restoration? Possible, but tricky. It will take some drilling and some putty-filling and re-sculpting. Thankfully I have other castings (red box version) that I can work from.
Tread carefully with online purchases. I got burned here. Not only because of the lead rot but because several of the figs are not from this set. It was a gamble buying them, but that's how it goes sometimes. No hard feelings. Get those old minis out of the garage and the attic and into more decent conditions.
Some more info here.
Mike Monaco wrote up a nice piece here about lead rot. For those of you who know what it's like, you can sympathize, but for those who have not seen it, below are some excellent examples of in-progress rot, eating away at some classic Grenadier minis.
Here are two sets, both Grenadier's Fighting Men (red box series came out after the original AD&D sets, so the bottom one is the older one).

Online auctioneers who are selling metal soldiers may think of them as just that, a box of metal soldiers. They are most likely not aware of the condition they are in and so do not include that in their descriptions. No hard feelings, it is what it is. (in this case the seller didn't know much at all, several of the figs are not even part of this set, they're strange orphans from other Grenadier sets or blisters - I'll have to spend some time trying to ID them) I was annoyed though, to say the least. I bought the red-box version some months ago, and three out of the ten figs were afflicted. So I spent a little time looking for a duplicate set to replace the nasty figs. I got the original AD&D set and it came in the other day. My heart sank when I opened the lid and saw the awful dark gray, it was pretty bad, in fact this was the worst I've seen so far. Here are the ghastly images:
Terrible
Looks like a disease of some kind, the rot bubbles up...

Nasty
You can actually see the cracking in this image, it's like what happens to the people in Lovecraft's The Colour Out of Space

Gross
More cracking on the archer. Curious where the rot starts on some of the figures...

Disgusting
The year and company inscription barely visible... green stuff too, not the good kind...

Hideous
Simply awful, once a nice flat shield, now a pizza-like moonscape, the likes of which might be seen on Dorian Grey's mug shot...

This one was interesting because the figure is not yet physically deformed, but the shades of gray appearing foretell how things will go. Now that these are with me they will be properly stored, hopefully progress of the rot will be arrested.

Restoration? Possible, but tricky. It will take some drilling and some putty-filling and re-sculpting. Thankfully I have other castings (red box version) that I can work from.
Tread carefully with online purchases. I got burned here. Not only because of the lead rot but because several of the figs are not from this set. It was a gamble buying them, but that's how it goes sometimes. No hard feelings. Get those old minis out of the garage and the attic and into more decent conditions.
Some more info here.
Wednesday, May 25, 2011
A Few Worthwhile Links
Found a few links to other blogs and such that are pretty cool for the classic miniature enthusiast:
Nice blog with some classics, focus on Grenadier:
Old School Miniatures Bulletin
A blog featuring some in-progress paint jobs:
Duke of the Blood Keep
and Witchhunter is always valuable, some VERY interesting minis for all ranges of interest:
Witchhunter
Nice blog with some classics, focus on Grenadier:
Old School Miniatures Bulletin
A blog featuring some in-progress paint jobs:
Duke of the Blood Keep
and Witchhunter is always valuable, some VERY interesting minis for all ranges of interest:
Witchhunter
Wednesday, May 18, 2011
Heavy Metal
I've been reading some interesting things lately about Games Workshop's forthcoming shift from metal to some sort of resin in the manufacture of their miniatures. I won't pass any judgement on this move until I read more about what the replacement material is like, but my personal sense is that metal has certain qualities that are so inherent to the format of table-top wargaming that it will be a difficult transition for many folks to make.
That is to say: if they are dedicated exclusively to GW products and games.
It is important to consider that there are many companies out there who will continue to use metal in their products. This will all be very interesting to observe as it unfolds. I believe the official announcement of what GW calls their 'Finecast' line will be around May 20th or so.
Saturday, April 2, 2011
Top Notch Sculpting
I love this kind of stuff - top notch professional sculpting in progress.
If you have not seen Oz Painters, then take some time and sit down a look through the pages, it's really consistently higher-end material, sculpting, conversions and painting.
I'm posting this in place of any actual activity on my own part.
(as a total fluke I got to see Peter Murphy performing while I was on a business trip in Richmond, Virginia. Great show, excellent performer, the tour's still going so look him up and see him)
Friday, March 25, 2011
Rogue Trader Era Metal Space Marines

Old Space Marines. When Space Marines were Space Marines.

I remember getting these guys at a long gone NY store called Dragon's Den, probably around Christmas or a birthday. They came ten in the box, with bases and sprues with the jump-packs. The box was unique for Citadel, I have never seen them around since: a clear plastic box with rounded corners and a slide-lid. It's very handy, I've kept it for small bits and pieces.

These were the first Space Marines I had, the concept was really cool in those days. Games Workshop takes themselves far too seriously now for my tastes, back then it was funny, touch of humor and tongue in cheek, very punk-style to the whole thing.

Painted using a Citadel selection of paints, if I concentrate I can almost remember the smell of the paint.

These really are terrible miniatures as things go, even for older ones, the sculpting and casting is very mushy, quick and not too concerned about details so much.
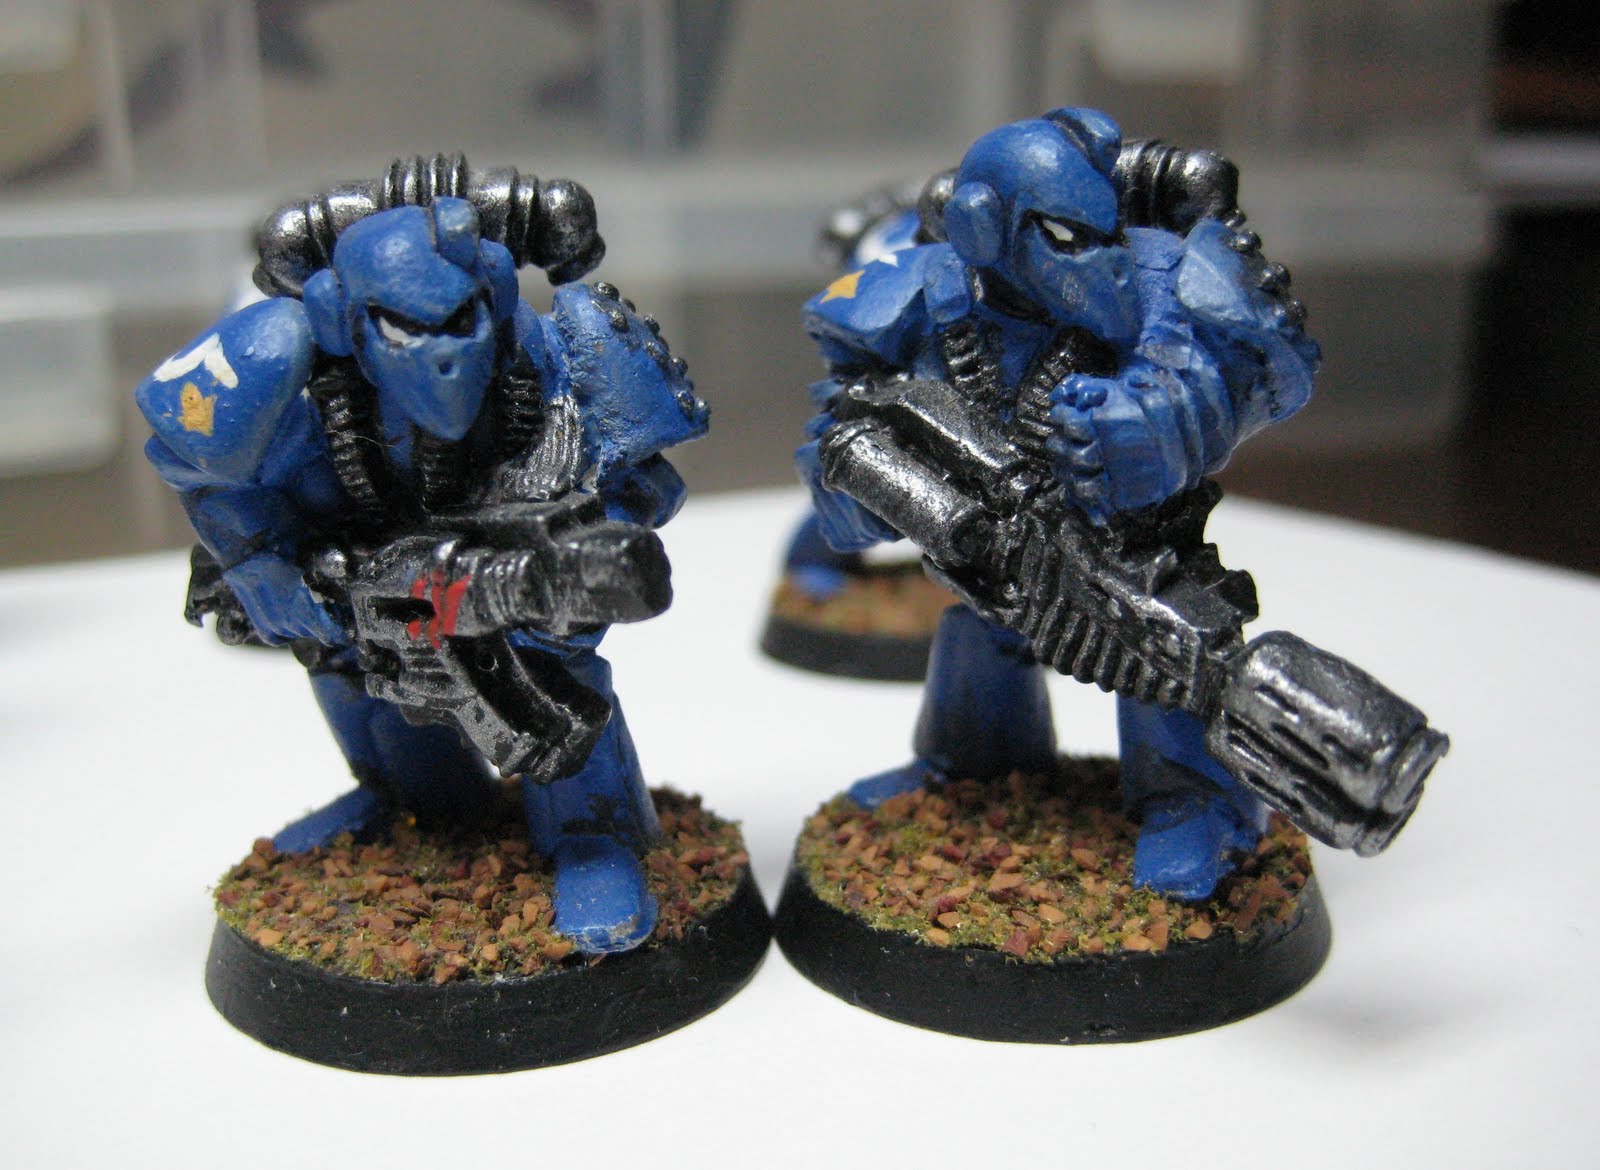
I'd love to restore these guys with fresh paint but I could never strip these, the original paint is too much a time capsule for me.
New Paint on the Troll

The Troll, having received a new paintjob. This is the second figure I had painted in about 15-16 years, not so bad I suppose. It's far easier to sit down and do this stuff when there's some sort of consistency to the activity, so starting into it after so long was a bit weird, didn't quite remember what to do. But now it's going to be a new education in painting, after all the years of learning about different mediums and materials, I can look at the task with a new perspective, and hopefully give these older figures the justice they deserve.
Monday, March 21, 2011
Troll Restoration
The Troll from the Horrors of the Marsh needed help. Whereas the Salamanewt's weapon breakage was due to over-handling and a weak point in the casting, the Troll was, at some point in time, deliberately cut for a diorama that never came to be. The body needed re-attaching with the base and feet.

 As with the Salamanewt a suitable drill bit was found, and the holes were very carefully drilled into both sides.
 Brass rod was measured and cut, super-glued in and the Troll was set to dry, clothespin clamp holding him in the right position.
 To close the gap between the two pieces, Green Stuff was added, at the join there is some hair-detail on the original, so I was able to blend it in nicely without the 'wound' being too obvious.
The Troll is now back in action, stronger than before for the brass pins in his legs, ready to be primed and painted.


The Troll is now back in action, stronger than before for the brass pins in his legs, ready to be primed and painted.
Subscribe to:
Posts (Atom)