I've got two days to paint a very large classic Grenadier miniature, and it will not happen. A little tiny bit less than one year ago I pledged to complete the Grenadier Death Giant of the Undead Legion
But things get in the way when one is older than one used to be. In the olden times entire evenings could be spent on painting, as long as the hands were willing and the eyes could hold out, and the books-on-tape kept rolling, the sky was the limit.
But now there's barely an inch in between all the 'grown-up' stuff, the mortgage, the gutter cleaning, operating a business, raising children, etc.
When I thought about writing this entry to resolve the unresolved pledge from a year ago I was bitter about it and angry that I was never able to find time in a hectic timeline of responsibilities. But as I write this I realize all of these things are blessings, and there will be time enough eventually to tackle the big old skeleton.
I used the excuse of being tired frequently, and instead of breaking the paints out would fall asleep watching some classic Doctor Whos (mostly Jon Pertwee era) as it took less energy. Not a bad way to kill an evening or two.
I did manage to finish a sculpt (future post) and I fell back into the addiction of LEGO, and I found a few more oldie minis that will now be slated for restoration (Dark Horse Miniatures mutants).
Honestly, with all the garbage going on in the world, I cannot complain, and I'll get the big skeleton done, someday. It's been over 25 years so a little more time won't hurt.
Big up to all the great blogs that I've enjoyed during the year, all the great finds and the classic minis being painted, the magic world of miniature-make-believe really is in full gear. Have a healthy, safe, productive 2013.

A chronicle of projects restoring and sculpting scale fantasy and science fiction miniatures
Sunday, December 30, 2012
Friday, August 10, 2012
A Good Shirt
Ha - this is a bloody good shirt, I may actually get one:
Fantasy Miniatures Dark T-Shirt Miniatures CRYPTO PICTURA DESIGNS
Fantasy Miniatures Dark T-Shirt Miniatures CRYPTO PICTURA DESIGNS
Ancient Paint
I thought I had thrown this stuff out years ago, but I found it: Old Ral Partha and AD&D paints. Neat little bottles, really garbage paint even when fresh (I remember).

 The Citadel paints are still functional! This is the original Space Marine set. Some of the little opener tabs have been broken off from over-use. I still have the manual that came with the set.
And the smell! I forced the top off one and the smell is a time machine - brings me right back to the olden times. Golden Oldies:
The Citadel paints are still functional! This is the original Space Marine set. Some of the little opener tabs have been broken off from over-use. I still have the manual that came with the set.
And the smell! I forced the top off one and the smell is a time machine - brings me right back to the olden times. Golden Oldies:


Thursday, August 9, 2012
Metal Head: Home Brew Molding and Casting Video
I love this kind of stuff, just found this today but the vids been around for a while.
Monday, July 16, 2012
The Vault at Guedelon Castle
I love castles, and I'm ever so pleased that the construction of one is really occurring in France, old tools and styles. I have been familiar with the activity for a few years but they are really making cracking good progress. Found this neat little preview of a piece that covers the construction of a vault within the castle.
Friday, June 8, 2012
Old Project: Rogue Trader Plastic Marine Conversions
Here are some old Rogue Trader plastic marines (from the original Imperial Marines box) done over with alterations. I did these years ago, these are relics from the early nineties, but I'm still quite proud of how inventive these alterations are (mostly with weaponry). The execution is so immediate: not concerned too much with quality so much as being legible.
Here's a scratchbuilt AK-47, with strap, I can see the banana-clip is made from bolter magazines, aside from that I can't tell what the rest is made of.

Bolter with strap (paper cut into strip and painted) with wire tail-stock. I can see that this arm took a little persuasion to get into more forcible pose.

Uzi, all scratchbuilt. Textured handgrip is a piece of Sculpey that I rolled a gnurled X-Acto handle grip on to get the patterned texture.

Battle-Damage. Cut and melted away plastic pack, a soldering iron or glue-gun tip was probably involved, and the 'exposed' metal part came from a little box of cool watch parts I got from a craft store.

Two magazine duct-taped together. Note the painted on 'eyes' on the nose cone. I think I did some WWII style teeth as well on some of the cones-faces.

Then there's this guy: Skeletal robot tripod, from some Citadel skeleton parts, an Eldar arm and a chopped up chaos autocannon.

Tuesday, April 3, 2012
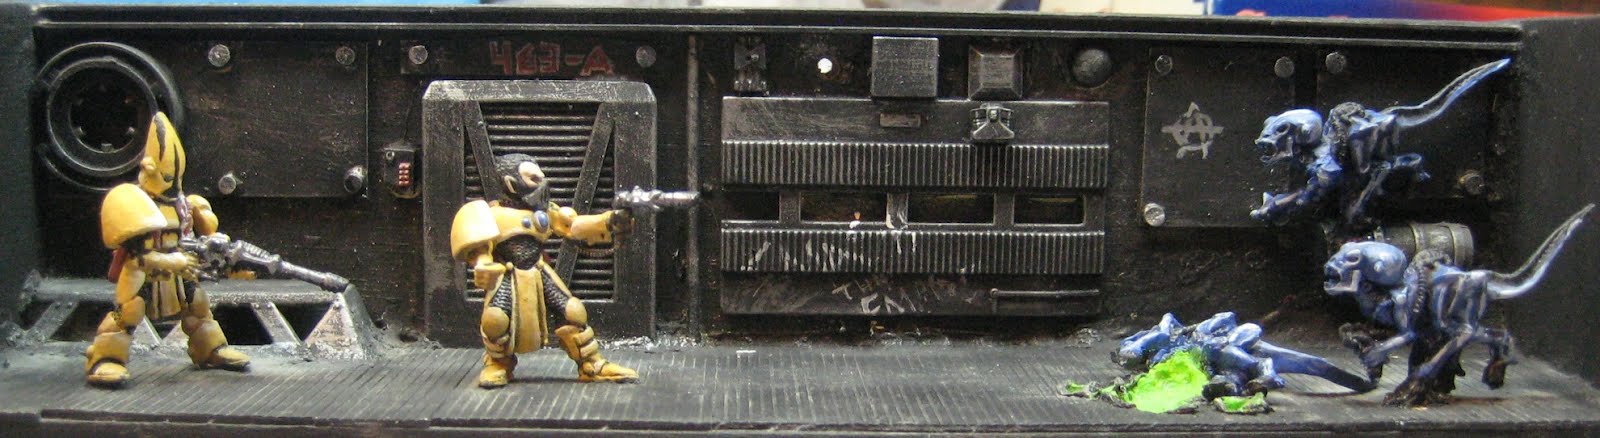
Embarrassing Old Project I: Diorama, Eldar and Hunter Slayers
Dirty laundry, the nasty old embarrassing projects from the past, badly painted minis and horrible conversions. Here's my confession for the week.

This was un-earthed while moving recently. A diorama of two Eldar meeting some Hunter Slayers in a space-hulkesque hallway. I don't know how old I was when this was made but I do claim responsibility, it's awful! But I can imagine having a lot of fun making it.
Golden oldies like these are informative as they help gauge the leaps in skill that we sometimes forget (or do not even sense).
The Eldar without helmet must have had a sword of some kind in that fist (long gone). Both have had Rogue Trader plastic marine shoulder pads added (why I don't know).

The Hunter Slayer on the wall has an Eldar arm replacing a shaved-off metal one (perhaps to pose it differently?). Here they come!!!

The Hunter Slayers came from a blister, old catalogs state they were designed by renowned Michael Perry. These guys I will yank out, strip and restore. The anarchy graffiti makes me think that Necromunda was more the setting in mind...

"Looks like somebody bagged one of Ripley's bad guys"
courtesy a hot glue-gun tip

The plates of styrene on the floor aren't even cut straight! It was as though I didn't know what a ruler was...
There's a hole drilled through the wood to accommodate an LED light (never put in).
And that is a cassette reel glued to the back wall.

"Cleanup on level 463-A"
A little Marine accessory on the wall there, and the vertical pipe next to the door: a piece of spaghetti.

Thanks for the memories: To be dismantled

A neat project would be to remake the thing, done all proper with details and all maxed out like something on Coolmini... or maybe I'll just take the trash out and go to sleep...
Anybody want the Eldar? I may have some additional plastic arms as well. Let me know.

This was un-earthed while moving recently. A diorama of two Eldar meeting some Hunter Slayers in a space-hulkesque hallway. I don't know how old I was when this was made but I do claim responsibility, it's awful! But I can imagine having a lot of fun making it.
Golden oldies like these are informative as they help gauge the leaps in skill that we sometimes forget (or do not even sense).
The Eldar without helmet must have had a sword of some kind in that fist (long gone). Both have had Rogue Trader plastic marine shoulder pads added (why I don't know).

The Hunter Slayer on the wall has an Eldar arm replacing a shaved-off metal one (perhaps to pose it differently?). Here they come!!!

The Hunter Slayers came from a blister, old catalogs state they were designed by renowned Michael Perry. These guys I will yank out, strip and restore. The anarchy graffiti makes me think that Necromunda was more the setting in mind...

courtesy a hot glue-gun tip

The plates of styrene on the floor aren't even cut straight! It was as though I didn't know what a ruler was...
There's a hole drilled through the wood to accommodate an LED light (never put in).

A little Marine accessory on the wall there, and the vertical pipe next to the door: a piece of spaghetti.

A neat project would be to remake the thing, done all proper with details and all maxed out like something on Coolmini... or maybe I'll just take the trash out and go to sleep...
Anybody want the Eldar? I may have some additional plastic arms as well. Let me know.
Friday, March 30, 2012
Bolting a Large Mini to a Wooden Base
For the Grenadier Death Giant, I did not want the model to be permanently affixed to the wooden base I prepared, so I engineered a method of bolting it, so that it may be removed if need be.
The model itself has a hollow cavity on its cast base, so I had room to install two customized nuts. Slots were cut in with a hacksaw to give a gripping point to some wire anchors, as well as an encasement of resin that would surround them.

The placement of the nuts within the model's cast base came first, marks for the holes were then transcribed to the wooden base using a few measurements and tracing paper.
I realized that the whole figure tilted way too far back, so I started building up a rim of Green Stuff on one edge of the base to level him out.

To fit one of the nuts in properly some metal needed shaving off. A vice and a large file negotiated the deal.

A few bits of brass and some Green Stuff positioned the nuts in the hollow, and strong casting resin was poured in (foamed up a bit but was trimmed flush after curing) to permanently lock the nuts in position. Bolts feed through the bottom of the wooden base, into the nuts, and the connection is quite snug (being careful to not over-torque of course).

Fancy Footwork

The model itself has a hollow cavity on its cast base, so I had room to install two customized nuts. Slots were cut in with a hacksaw to give a gripping point to some wire anchors, as well as an encasement of resin that would surround them.

The placement of the nuts within the model's cast base came first, marks for the holes were then transcribed to the wooden base using a few measurements and tracing paper.
I realized that the whole figure tilted way too far back, so I started building up a rim of Green Stuff on one edge of the base to level him out.

To fit one of the nuts in properly some metal needed shaving off. A vice and a large file negotiated the deal.

A few bits of brass and some Green Stuff positioned the nuts in the hollow, and strong casting resin was poured in (foamed up a bit but was trimmed flush after curing) to permanently lock the nuts in position. Bolts feed through the bottom of the wooden base, into the nuts, and the connection is quite snug (being careful to not over-torque of course).


Monday, March 19, 2012
Drop the Base
The Death Giant needs to know where he stands. The cast base is okay, but he will need something more substantial so I decided to have a go at hacking out a wood base. I may just paint the base as staining it will make the end-grain look awful, plus I can then adjust color to best suit how the finished model looks.
Being that I had limited access to woodworking tools, I did everything by hand.
I found a chunk of wood (this was cut off of a wooden palette) and measured out a decent little shape to fit the footprint of the model.

A few basic cuts with a hand-saw and the block is in shape. The bolts are in holes going straight through (I'm bolting the Giant, not gluing him, onto the base).

I measured out an interior edge .25" from the outermost edge to create a little bevel. I notched in a series of diagonal cuts around the edge, and started carving down to that measured edge. Hiring a beaver would have helped, but the job got done nonetheless.

A kiss of the sandpaper and it's shaping up. That inner angle is a bit crap but I can shape that up as I go.

Not exact but I don't really shoot for exact anymore, it just leads to disappointment when it's not achieved! Call it 'folk' art.

And the headless Giant stands proud on his new footing. I'll share my bolting method in the next post. Cheers and happy Spring! (which always means it's getting to be excellent weather to spray-prime outdoors again!)

Friday, March 2, 2012
Grenadier Death Giant: Arm Support
With a big model like the all metal Grenadier Death Giant of the Undead Legion, strong support is needed to hold those parts up. I had arranged a decent pin for the upright axe-wielding arm, but I felt more was necessary and so added another pin.
There was no more room in the arm cast to drill another deep hole. Half of the cast was now occupied by a failed attempt: a snapped drill bit embedded in the metal. I had enough to seat a pin comfortable, but the corresponding hole would have to be on the torso.
To do this, I had to build up an area of Green Stuff, let it cure, then drill into that.

A brass pin was seated into the arm casting,

The two pins participate nicely, one being rooted in the torso casting (old steel) and one being rooted in the arm casting (brass),

The fit works well, and the two pins being (of course) ever so slightly not parallel actually makes for a nice tight grip, even without glue.

But an unsightly gap needs some filling and detailing with more Green Stuff. I'll share the progress soon. Thanks again for tuning in to this blog!
Tuesday, February 21, 2012
The Un-Fun of the Dungeons & Dragons Labyrinth Game

I don't really remember where I got it from, but I do remember trying to figure out how it worked, navigation through the 'labyrinth' is built upon audio responses from the board. There are little wall pieces and two metal fighters, a dragon and some treasure.
The box art is beautiful, characteristically uncharacteristic for the early days of D&D.

I like the graphics, not only of the spectacular box art, but the board itself, a repeating tile-work of little woodcut type drawings.


Tuesday, February 7, 2012
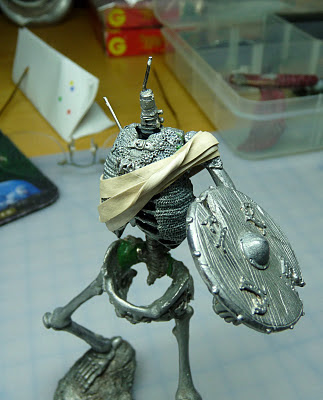
Grenadier Death Giant Skull-Work
Attention moved to the skull. The jaw is cast as a separate piece and needed some good adhesion to the skull. With a fine drill bit, and fine brass wire, the piece was pinned into place.

The trick of it was perfecting the final pose, so that jaw looked natural. I wanted it to be slightly open. A few shims of thin wood were placed in between the teeth, a bit of clay helped keep it in place before it was strapped with rubber bands for drilling.

Again I went straight through the two pieces from one side, making true the alignment of the pins. Green Stuff fills any offending holes. The yellow lines show where the pins are.

It's the little things, like this tiny jaw, that take a lot of time. Big things seem to take care of themselves. I considered leaving the jaw out, making him look really messed up from past battles, a little scarier perhaps... but my instinct told me to stay true to the model as it was cast.

Last part to getting the head right was to 'register' it on the top of the spine, so it would peer out in the right direction. I worked with the steel pin I installed many years ago, but the head tended to swing down to a silly pose. I created a special notch out of Green Stuff, with a corresponding notch on the skull. This makes sure that there will be no wiggle-room at all when the skull is glued into place.
I tell you it was a devil getting the 'look' right, I felt like a fashion photographer posing my subject, a push here, and move there, and perfect. Except in fashion photography the models are typically much skinnier than the relatively plump Death Giant.

Cheers. Maybe I'll actually post some smaller minis soon too.
Tuesday, January 31, 2012
Death Giant Patchwork: Filling Gaps
Filling gaps on the Death Giant, recreating chainmail and a little bit of the necklace that's almost invisible on the casting...


And bones, ribs...


Posting progress here keeps the project rolling, it builds discipline. What do I do if I achieve the goal (finish the model within 2012)? At this rate I may have to establish another goal...


And bones, ribs...


Posting progress here keeps the project rolling, it builds discipline. What do I do if I achieve the goal (finish the model within 2012)? At this rate I may have to establish another goal...
Thursday, January 26, 2012
Death Giant Left Arm: Joining Two Heavy Castings
In 2003 or so I had installed a pin to hold the left arm of the Death Giant, a corresponding hole was drilled into the shoulder of the arm casting, but on closer review I ascertained that there wasn't enough metal at that point on the arm casting to hold the arm in place with confidence.

The new goal was to increase the strength of the shoulder joint to hold the weight of the arm casting (which is quite hefty as it includes the shield as well).
I installed a new second pin, a rather thick brass post, a bit lower than the original. This creates a strong gusset to hold up the arm.
This was NOT drilled through the arm all the way, using the technique I've recently posted. I wanted enough material to rest on top of the brass post, so the arm was only drilled half-way.

It's rather ugly now and betrays its presence, but I'll come up with some Green Stuff additions, some torn fabric and detritus, to mask it on the finished model.

The important thing is that it makes the joint between two heavy castings very strong.

Next step will be to 'blend' the two parts together by creating more mail armor and a bit of necklace chain. I'll also share the connection of the ribcage.

The new goal was to increase the strength of the shoulder joint to hold the weight of the arm casting (which is quite hefty as it includes the shield as well).
I installed a new second pin, a rather thick brass post, a bit lower than the original. This creates a strong gusset to hold up the arm.

This was NOT drilled through the arm all the way, using the technique I've recently posted. I wanted enough material to rest on top of the brass post, so the arm was only drilled half-way.

It's rather ugly now and betrays its presence, but I'll come up with some Green Stuff additions, some torn fabric and detritus, to mask it on the finished model.

The important thing is that it makes the joint between two heavy castings very strong.

Next step will be to 'blend' the two parts together by creating more mail armor and a bit of necklace chain. I'll also share the connection of the ribcage.
Subscribe to:
Posts (Atom)